
Understanding Bathroom Sink Sizes Standard: A Practical Guide

Ever stood in front of the empty space where your bathroom sink should be and felt a tiny panic rise? You’re not alone—most of us have stared at that vague opening and wondered, “What size actually fits here without looking like a DIY disaster?”
That moment of uncertainty is the perfect place to start learning about bathroom sink sizes standard. The industry generally groups sinks into three main widths: compact (12‑14 inches), medium (16‑18 inches), and spacious (20‑24 inches). Height usually ranges from 5 to 9 inches, while depth—how far the basin extends from the wall—often falls between 8 and 12 inches. These dimensions aren’t random; they’re shaped by vanity widths, countertop overhangs, and even the ergonomics of daily use.
Take Sarah’s small apartment bathroom as a real‑world example. She opted for a 13‑inch compact sink to keep the space feeling open, pairing it with a wall‑mounted faucet to free up floor room. In contrast, Mike’s master suite boasts a double‑bowl 22‑inch vanity, so he chose a larger 23‑inch sink that balances the visual weight of his marble countertop.
Here’s a quick checklist you can run through while you shop:
- Measure the width of your vanity or wall space—leave at least 2 inches on each side for clearance.
- Confirm the countertop depth; the sink’s bowl should sit comfortably within the overhang without spilling.
- Check the rough‑in height for your faucet to avoid awkward reach.
- Consider the style—pedestal, wall‑mounted, or drop‑in—and how its dimensions affect overall flow.
When you’re ready to compare options, online shopping for sinks with fast US shipping offers a convenient way to filter by width, depth, and installation type, making it easier to match the exact measurements you recorded.
But don’t stop at the sink. If you’re renovating the whole bathroom, the flooring you choose can shift the visual balance of the space. A professional flooring contractor, such as Millena Flooring, can help you select the right floor material and layout that complements your sink size and overall design.
So, what should you do next? Grab a tape measure, note the three key dimensions—width, depth, and height—and start browsing. You’ll quickly see patterns emerge, and the right size will feel obvious before you even place the order.
Remember, a well‑chosen sink size isn’t just about fitting; it’s about creating a comfortable, functional hub that feels right every time you wash your hands or brush your teeth. Let’s dive deeper into each size category and see how they work in different bathroom layouts.
TL;DR
Choosing the right bathroom sink size—whether compact, medium, or spacious—ensures your vanity looks balanced, your faucet reaches comfortably, and daily tasks feel effortless.
Measure width, depth, and height, match them to your space, and browse curated options to find a sink that fits your style and budget without a guesswork headache.
Common Bathroom Sink Types and Their Standard Dimensions
When you stare at the empty vanity, the first question that pops up is usually, “What kind of sink actually fits here?” The answer isn’t one‑size‑fits‑all – it depends on the sink style and the dimensions that come with it.
Pedestal Sinks
Pedestal sinks are the classic, freestanding option that sit on a narrow column. They typically range from 16‑20 inches wide and about 12‑14 inches deep. Height is the big variable – most sit between 29‑33 inches from floor to rim, which works well in smaller bathrooms because they don’t eat up floor space.
Because the basin is the only thing that occupies the wall, you’ll often see a single‑hole faucet configuration. A real‑world example: Jenna’s guest bathroom uses a 17‑inch pedestal sink, keeping the room airy while still providing a comfortable wash height.
Wall‑Mounted (Vanity‑Back) Sinks
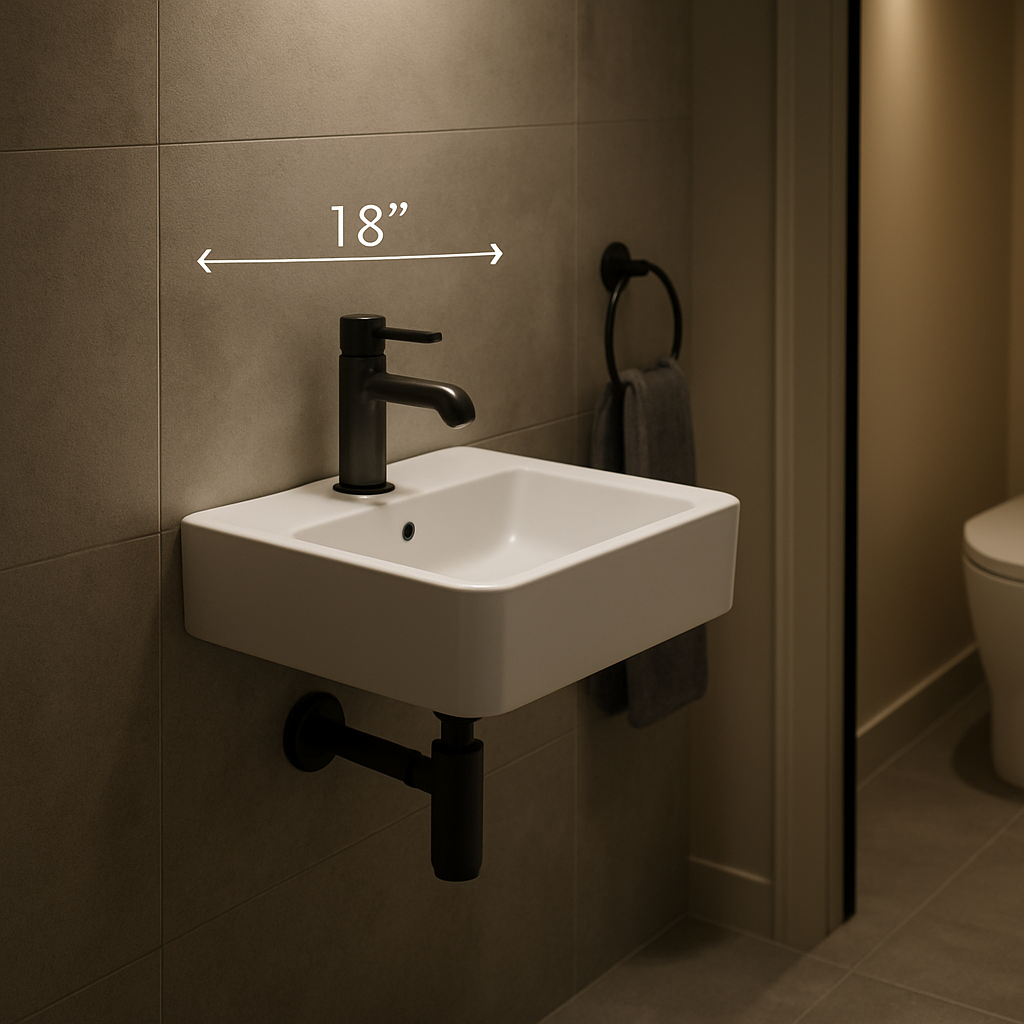
Wall‑mounted sinks attach directly to the wall or a slim vanity back, making them perfect for tight corridors. Standard widths sit at 16‑18 inches, with a depth of 6‑9 inches. The rim usually sits at 34‑36 inches, aligning with modern vanity heights.
According to design experts on vessel‑sink height guidelines, a comfortable rim height for most adults is around 35‑36 inches, which matches the typical wall‑mount installation.
Try it yourself: Measure from the floor to where you want the faucet to sit, then subtract the faucet height (usually 2‑3 inches) to get the ideal sink rim.
Drop‑In (Self‑Rimming) Sinks
Drop‑in sinks sit inside a cutout in the countertop. They’re the most common in family bathrooms because they’re easy to install. Widths span 16‑24 inches, with depths of 7‑10 inches. The overall height of the vanity plus countertop usually lands at 34‑36 inches.
Vevano notes that “a double vanity sink situation benefits from a minimum center‑to‑center spacing of 30 inches” to avoid elbow‑bumping (bathroom sink dimensions guide).
Practical tip: When ordering a drop‑in, add at least 1 inch of clearance around the lip so the sink rests securely without stress on the countertop.
Undermount Sinks
Undermount sinks are glued beneath the countertop, giving a seamless look. Widths typically range from 18‑22 inches, while depth can be 6‑9 inches. Because the rim is flush with the countertop, the overall height of the vanity is the main factor – aim for 36 inches for most users.
One trick pros use: Double‑check the cabinet’s interior height. An undermount that’s too tall will interfere with the faucet’s reach, while one that’s too short may look odd.
Vessel Sinks
Vessel sinks sit on top of the countertop like a decorative bowl. They come in a huge range of sizes, but the rule of thumb is to keep the lip 1‑inch from the countertop edge. Typical diameters are 12‑18 inches for single bowls, and up to 24 inches for larger, statement pieces.
Because they add height, you’ll often need a lower vanity (around 28‑30 inches) so the final rim height ends up at that comfortable 35‑36 inch range mentioned earlier.
Actionable step: Measure your countertop thickness, then add the vessel’s height and subtract from the desired 36‑inch rim. That tells you the ideal vanity height.
Whether you’re leaning toward a sleek drop‑in or a vintage pedestal, the key is matching the sink’s standard dimensions to the space you have.

Ready to start shopping? Online shopping for Bathroom with fast US shipping. lets you filter by sink type, width, and depth, so you can instantly see which models meet your measured specs.
Finally, keep a quick checklist handy: width + 2 inches clearance each side, depth fits within countertop overhang, and rim height aligns with your comfort zone. Follow these steps, and you’ll avoid the dreaded “sink‑too‑big” surprise when the box arrives.
Measuring Your Bathroom Space for the Right Sink Size
Imagine standing in front of that empty vanity, tape measure in hand, wondering if the sink you love will actually fit. That moment of hesitation is totally normal, and it’s where the real work begins.
The first thing we do is map out the three critical dimensions: width, depth, and the height of the rim where you’ll stand. Grab a steel tape, not a stretchy one, because precision matters.
Step 1: Measure the vanity or wall opening width
Start at the inner edge of the cabinet or wall mount, then stretch the tape to the opposite edge. Subtract at least 2 inches total – one inch each side – to give the sink breathing room. For example, if your vanity is 30 inches wide, you’ll target a sink no wider than 28 inches.
Real‑world scenario: Maya’s 48‑inch bathroom has a 30‑inch floating vanity. She chose a 26‑inch drop‑in sink, leaving a comfortable 2‑inch gap on each side, which keeps the look balanced and prevents water from spilling over the edge.
Step 2: Check the countertop or wall depth
Measure from the wall to the front edge of the countertop. Most countertops overhang 1–1.5 inches, so the sink bowl should sit comfortably within that space. If your countertop depth is 22 inches, a 10‑inch deep vessel sink will sit well inside, leaving a 12‑inch clearance for faucet hardware.
Pro tip: When you’re dealing with a wall‑mounted sink, the bowl sits directly on the wall. In that case, you’ll want the bowl depth to be no more than the distance between the wall and the nearest obstacle – like a towel rack or medicine cabinet.
Step 3: Determine the ideal rim height
Most adults find a rim height of 34‑36 inches the sweet spot. Measure from the finished floor to the top of the existing countertop (or the height you plan for a new one). Then, decide if you need a lower vanity for a vessel sink or a higher one for a drop‑in.
Example: Carlos installed a 9‑inch‑tall vessel sink on a 30‑inch vanity. He added the sink’s height (12 inches) and got a final rim height of 42 inches – too high for him. By swapping to a 28‑inch vanity, his rim settled at a comfortable 35 inches.
Step 4: Verify clearance for the faucet
Measure the distance from the floor to the faucet’s spout tip. Subtract the faucet height (usually 2‑3 inches) from your desired rim height. That tells you exactly where the sink’s top should sit. If you have a high‑arc faucet, you may need a slightly deeper bowl to avoid splashing.
Take note of any adjacent fixtures – a towel bar, soap dispenser, or lighting – because they can eat into the usable space.
Step 5: Create a quick sketch
Grab a piece of graph paper, draw the vanity outline, and mark the sink dimensions you’ve measured. Seeing the layout on paper helps catch mistakes before you order.
And don’t forget to double‑check your numbers. A common mistake is forgetting the countertop thickness (often 1‑inch). Add that to your depth calculation, or you’ll end up with a sink that sticks out awkwardly.
Once you have all three measurements, you can start filtering options online. Online shopping for Bathroom Accessories with fast US shipping. includes a range of sink brackets, faucet kits, and trim that can help you fine‑tune the fit.
Quick checklist before you click “Add to Cart”:
- Width ≤ vanity width − 2 inches.
- Depth ≤ countertop overhang − 1 inch.
- Rim height ≈ 34‑36 inches for comfort.
- Faucet clearance verified.
- All measurements re‑checked twice.
Follow these steps, and you’ll avoid the dreaded “sink‑too‑big” surprise when the box arrives. Measuring might feel a bit tedious, but it’s the secret sauce that turns a bathroom renovation from a gamble into a confidence‑boosting project.
Choosing the Right Sink Size for Different Bathroom Layouts
Ever walked into a bathroom and thought, “If only this sink didn’t make the room feel cramped”? You’re not alone. The truth is, the sink’s footprint can either open up a space or shut it down, depending on how it matches the layout.
1. Tight‑Fit Corridors and Powder Rooms
In a narrow hallway bathroom, every inch counts. A compact 12‑14‑inch pedestal or wall‑mount sink is usually the sweet spot. Look at Maya’s 5‑ft corridor bathroom: she chose a 13‑inch wall‑mounted bowl, left a clear 2‑inch aisle on each side, and now the space feels like a breezy hallway rather than a closet.
Pro tip: measure the distance from the nearest door swing to the vanity edge. If the swing clears by less than 12 inches, you’ll want a sink no wider than 14 inches. That tiny margin prevents the door from catching on the faucet handle.
2. Mid‑Size Family Bathrooms
Most families fall into the 6‑8‑ft bathroom range. Here, a medium 16‑18‑inch drop‑in or undermount works well, especially if you have a double‑vanity. For example, the Johnsons installed a 17‑inch undermount sink on each side of their 48‑inch double vanity. The bowls sit comfortably within the countertop overhang, giving them 2‑inch side clearance for towels and soap dispensers.
When you’re planning a double‑vanity, aim for a minimum center‑to‑center spacing of 30 inches to avoid elbow‑bumping. Lowes notes that most standard rectangular sinks range from 19‑24 inches wide and 16‑23 inches long, with a typical basin depth of 5‑8 inches, so pick the narrower end of that range for tighter layouts.
3. Luxury Master Suites
When you have a sprawling master bathroom, you can let the sink be a statement piece. A 20‑24‑inch vessel or a large rectangular drop‑in anchored in a floating vanity adds drama without overwhelming the room—provided the vanity’s height balances the bowl’s height. Carlos, who renovated his 10‑ft master, opted for a 22‑inch vessel sink on a 30‑inch vanity. The combined height hit his sweet spot of 35‑36 inches, making the sink feel proportionate.
Check the vanity’s depth, too. A deeper vanity (around 22 inches) can accommodate a larger bowl without the risk of water spilling onto the floor.
4. Corner Nooks and Odd Angles
Corner sinks are the unsung heroes of oddly shaped bathrooms. They tuck into the unused space, freeing up the main wall for storage. Emma’s apartment had a 3‑ft by 4‑ft nook that was otherwise dead space. She installed a 14‑inch corner pedestal sink, and the bathroom instantly felt more functional.
Just remember: if the plumbing isn’t already in the corner, you’ll need to factor in the cost of rerouting pipes. That’s a small price for reclaiming precious floor space.
5. Actionable Checklist for Any Layout
- Measure width, then subtract 2‑inches total for side clearance.
- Measure countertop depth; keep bowl depth ≤ overhang‑1‑inch.
- Confirm rim height lands between 34‑36 inches for comfort.
- Verify faucet arc clears the bowl (low‑arc for compact sinks, high‑arc for vessels).
- Consider adjacent fixtures – towel bars, mirrors, or cabinets can eat up space.
Once you have those numbers, you can start filtering options online. Online shopping for Furniture with fast US shipping. includes vanity cabinets that pair perfectly with the sink sizes we’ve discussed.
Don’t forget the little details: a 15‑Pack Countersink Drill Bit Set can make installing a new faucet a breeze, especially if you’re swapping out an old high‑arc model for a sleek low‑arc that saves space.
Lastly, if you’re curious about how a healthier lifestyle ties into bathroom design, check out Natural Elevate’s mushroom blends for natural energy. A relaxed mind makes the whole renovation process feel less stressful.
Standard Sink Size Comparison Table
Okay, let’s get down to the nitty‑gritty of bathroom sink sizes standard. You’ve measured, you’ve sketched, now you need a clear side‑by‑side view so you can compare without the mental gymnastics.
What to look at
When you line up the options, focus on three things: overall width, bowl depth, and the height of the rim. Those three numbers dictate whether the sink will feel cramped, just right, or a bit show‑stopping in your space.
Here’s a quick mental check – does the sink fit within your vanity’s width minus two inches? Does the bowl sit comfortably under your countertop overhang? And does the rim land around 34‑36 inches for a comfortable stand? If you can answer “yes” to all three, you’re probably on the right track.
So, how do the three main size buckets stack up?
| Size Category | Typical Width | Bowl Depth | Best For |
|---|---|---|---|
| Compact | 12‑14 in | 5‑7 in | Powder rooms, narrow hallways, or any space where every inch counts. |
| Medium | 16‑18 in | 6‑9 in | Standard family bathrooms, double‑vanity setups, or mid‑size master suites. |
| Spacious | 20‑24 in | 8‑12 in | Large master baths, resort‑style retreats, or designer statement pieces. |
Notice the depth column? A deeper bowl can be a blessing in a larger bathroom because it gives you extra space for hands and hair, but in a tight corridor it can turn a sleek look into a splash zone.
And here’s a little secret: the rim height isn’t printed on every product page, but you can usually estimate it by adding the bowl height to your vanity’s countertop thickness. If the math lands you outside the 34‑36‑inch sweet spot, you might need a lower vanity or a different sink style.
Does this table clear up the confusion? If you’re still on the fence, picture yourself standing in front of the sink you’re eyeing. Can you comfortably reach the faucet without hunching? Is there room for a towel bar on either side? Those visual cues often decide faster than any spreadsheet.
When you’re ready to shop, remember you’ll need a few tools to get the job done. A good set of countersink bits makes installing a new faucet a breeze, especially if you’re swapping a high‑arc model for a low‑arc that saves space. Check out the 15‑Pack Countersink Drill Bit Set – it’s a tiny investment that can prevent a lot of frustration later.
Take a moment after the video to revisit the table. Spot the row that matches your vanity’s dimensions, then note the “Best For” column. That little note becomes your quick‑reference when you scroll through product listings online.
One final tip: when you filter sinks on a retailer site, use the width and depth ranges from the table as your filter criteria. Most sites let you set a minimum and maximum, so you’ll only see the sinks that truly fit.
With the comparison table in hand, you’ve turned a vague feeling of uncertainty into a concrete decision‑making tool. Go ahead, pick the size that feels right for your space, and enjoy the confidence that comes with a well‑chosen sink.
Installation Tips and Common Pitfalls
Set up a clean, measured workspace
Before you even touch the faucet, clear the vanity top, lay down a drop cloth, and double‑check the three core numbers from the bathroom sink sizes standard table – width, depth, and rim height. A quick visual of those dimensions on your floor helps you spot mis‑alignments before they become costly re‑drills.
Grab a pencil and lightly sketch the sink outline on the countertop. If the line sits too close to the edge, you’ll know you need a narrower bowl or a deeper overhang.
Step‑by‑step installation
1. Dry‑fit the sink. Place the sink in the cutout (or on the wall for a wall‑mount) without any sealant. Does it sit flush? If there’s a gap, shave a millimeter off the countertop with a rotary tool – but only enough to keep the bowl level.
2. Mark the faucet holes. Use the faucet template that came with the kit. Align it with the sink’s centerline, then mark the drill spots. A common mistake is drilling too close to the edge, which can crack the porcelain; keep at least 1 inch of ceramic around each hole.
3. Apply plumber’s putty or silicone. For a drop‑in, a thin bead of silicone around the lip prevents water seepage. For an undermount, a bead under the sink creates a watertight seal once the countertop is screwed down.
4. Secure the sink. Use the mounting brackets supplied by the manufacturer. Tighten the screws just past hand‑tight – overtightening can strip the wood or crack the stone. Ace Hi Plumbing warns against overtightening connections, noting that water expansion can crack overly tight joints.
5. Hook up the faucet. Slip the supply lines onto the shut‑off valves, then hand‑tighten the nut. The same source reminds us that “connections need to be just past hand tight” to avoid stress from thermal expansion.
6. Test for leaks. Run both hot and cold water, watch the joint seams, and wipe any drips. If you see a steady bead, tighten the coupling a quarter turn and retest.
Common pitfalls that trip even seasoned DIYers
Using the wrong parts is a classic slip‑up. Cheap chrome fittings may look fine, but they can rust in a humid bathroom. Stick with stainless‑steel or brass components whenever possible – they resist corrosion and keep your sink looking new for years.
Another frequent error is skipping the “clearance check” for the faucet arc. High‑arc faucets need extra bowl depth; otherwise the spout hits the basin and creates a splash zone. Measure the distance from the faucet tip to the bowl bottom before you buy.
Improper assembly often leads to recurring clogs. If the drain assembly isn’t seated squarely, debris can lodge at the connection point. A well‑aligned P‑trap makes cleaning easy and keeps the flow smooth.
Hidden leaks are sneaky. Many homeowners forget to inspect the underside of the sink after a week of use. A slow drip can soak the cabinet, cause mold, and damage flooring. Set a reminder to check the sealant line and supply lines after 7 days.
Finally, don’t ignore the countertop thickness. A 1‑inch laminate versus a 1‑½‑inch stone changes the depth calculation. Forgetting this detail can leave the sink perched too high or too low, compromising both aesthetics and ergonomics.
Quick checklist before you finish
- Width ≤ vanity width − 2 inches.
- Depth ≤ countertop overhang − 1 inch (account for material thickness).
- Rim height lands in the 34‑36 inch comfort zone.
- Faucet arc clears the bowl by at least 1 inch.
- All connections hand‑tight plus a quarter turn.
- Stainless‑steel or brass fittings used.
- Leak test run for 5 minutes, both hot and cold.
Following these steps turns a potentially stressful install into a satisfying weekend project. And if you ever hit a snag, remember the advice from the pros: a little patience, the right parts, and a mindful hand on every screw will keep your bathroom looking polished and functional.
Maintenance and Cleaning Guidelines for Standard Sized Sinks
You finally picked the perfect bathroom sink size, but a gorgeous bowl means nothing if it starts looking grimy after a few weeks.
Don’t worry—keeping a standard‑sized sink sparkling is easier than you think, especially when you break the chores into bite‑size steps.
Daily Quick‑Wipe Routine
Each night, grab a soft microfiber cloth, splash a little warm water, and give the basin a quick swipe. This removes toothpaste foam, soap residue, and the tiny water spots that turn into stubborn stains if you let them sit.
If you have a countertop overhang, run the cloth along the edge too—those hidden corners love to collect crumbs.
So, how long should you spend on this nightly habit?
Weekly Deep Clean
Pick a day—maybe Saturday morning when you already have coffee brewing—and set a timer for fifteen minutes.
Mix one part distilled white vinegar with two parts warm water in a spray bottle. Spray the entire bowl, the faucet base, and the surrounding countertop, then let it sit for five minutes.
Use a non‑abrasive sponge to scrub the surface; the mild acidity dissolves mineral deposits without scratching porcelain or stainless steel.
For the faucet aerator, unscrew it (most twist off by hand), soak it in the same vinegar mix for a few minutes, then rinse and reinstall.
Notice any lingering grime?
Monthly Maintenance Checks
Once a month, pull the sink’s drain assembly and give the P‑trap a visual inspection.
If you see hair or debris, loosen the slip‑nut, clear the blockage, and re‑tighten just past hand‑tight – over‑tightening can crack the pipe.
While you’re there, wipe the underside of the sink with a damp rag; moisture that lingers can foster mold on wooden cabinets.
Check the silicone seal around the lip—any cracks or gaps should be scraped away and re‑applied with a fresh bead of bathroom‑grade silicone.
Did you notice a water smell?
Special Situations
If you have a stone countertop, avoid acidic cleaners altogether; a pH‑neutral cleaner and a soft cloth will do the trick without etching the surface.
For a chrome or brass faucet, a tiny dab of olive oil on a cloth can keep the hardware from developing water spots and keep it gleaming.
When a sink is installed under a cabinet, make sure the cabinet doors aren’t dragging on the bowl—scrape a thin strip of felt onto the back of the door to silence the squeak.
Quick Reference Checklist
- Daily wipe with microfiber cloth.
- Weekly vinegar‑water spray and non‑abrasive scrub.
- Clean faucet aerator each week.
- Monthly inspect and clear P‑trap.
- Re‑apply silicone seal if cracks appear.
- Use pH‑neutral cleaners on stone; avoid harsh acids.
- Light oil on chrome/brass hardware quarterly.
Stick to this rhythm, and your standard‑sized sink will stay bright, odor‑free, and ready for daily use for years.
And if you ever feel stuck, remember the same three‑step formula works for any sink size—just adjust the tools to match your countertop material.
Finally, schedule a quick visual check after any major plumbing repair; a loose connection can leak slowly and cause hidden water damage that’s hard to spot later. That way you stay ahead of costly repairs.
Conclusion
So you’ve made it through the maze of widths, depths, and rim heights, and you’re probably wondering if all that measuring was worth it.
The short answer? Absolutely. When your bathroom sink matches the “bathroom sink sizes standard” for your space, you’ll notice everyday tasks feel smoother, and the room looks balanced without a single eye‑catching mismatch.
Remember the three quick rules we kept circling: keep the bowl at least two inches narrower than the vanity, let the depth sit comfortably under the countertop overhang, and aim for a rim height of 34‑36 inches.
If you stick to those numbers, you’ll avoid the dreaded splash‑zone, the cramped‑hand‑reach, and the need for costly re‑drills later on.
Got a stone countertop? Switch to a pH‑neutral cleaner and a soft cloth. Chrome faucet? A dab of olive oil now and then keeps it gleaming.
Now that you’ve got the checklist, the next step is simple: pick a sink that ticks those boxes, add it to your cart, and schedule a quick visual check after the install to catch any hidden leaks.
Feeling ready? Grab that tape measure one more time, double‑check the clearances, and let your bathroom finally feel like the polished, functional space you imagined.
FAQ
What are the “bathroom sink sizes standard” for a typical vanity?
Most manufacturers stick to three sweet‑spot ranges. A compact sink runs about 12‑14 inches wide, a medium one lands in the 16‑18 inch band, and a spacious model stretches from 20‑24 inches. Depth follows a similar pattern: 5‑7 inches for compact, 6‑9 inches for medium, and 8‑12 inches when you’re going big. Those numbers let the bowl fit under a standard 34‑36 inch countertop without looking cramped.
When you compare a sink to your vanity, remember the rule of thumb: subtract at least 2 inches total from the vanity width so the sink has breathing room on each side.
How do I know if a sink’s rim height matches the “bathroom sink sizes standard” for my height?
Comfort starts with a rim that lands between 34 and 36 inches from the floor. Measure the finished floor to the top of your countertop, then add the countertop thickness (usually 1‑1.5 inches). If the total sits in that sweet spot, most adults will reach without hunching. If you’re taller or love a higher‑arc faucet, you can push the rim up a bit, but staying in the 34‑36 inch window keeps the space feeling balanced.
Think about the last time you brushed your teeth – did you have to lean forward? That’s a clue the rim is off.
Can I use a vessel sink and still meet the “bathroom sink sizes standard”?
Absolutely, but you have to account for the extra height the bowl adds. A typical vessel sits 12‑18 inches tall, so you’ll want a lower vanity (around 28‑30 inches) to keep the final rim height around 35 inches. Width and depth still follow the standard ranges – most vessels stay 12‑24 inches across, so pick one that stays within your vanity’s width minus the 2‑inch clearance.
It’s a little math, but once you line up the numbers you’ll see if the look works without turning the sink into a splash zone.
What if my countertop overhang is only 1 inch – does that break the “bathroom sink sizes standard”?
Not necessarily, but you’ll need to be stricter on bowl depth. The rule of thumb says bowl depth should be no more than the overhang minus about 1 inch. So with a 1‑inch overhang, aim for a bowl that’s 5‑6 inches deep. That keeps water from spilling onto the floor and still respects the standard dimensions.
If you love a deeper bowl, you might have to extend the countertop or choose a wall‑mounted sink that doesn’t rely on the overhang at all.
How do I pick the right sink size for a double‑vanity layout?
First, split the vanity width in half, then subtract 2 inches total for side clearance on each side of the whole unit. That gives you the maximum width per sink. Most designers recommend at least 30 inches center‑to‑center spacing, so each bowl usually ends up in the 16‑18 inch medium range. Depth should stay within the countertop overhang, and rim height stays at the 34‑36 inch standard.
When you’re shopping, filter for those exact width and depth numbers – it saves a lot of guesswork.
Is there a quick checklist to verify I’m following the “bathroom sink sizes standard” before I buy?
Sure thing. Write down three numbers: vanity width minus 2 inches, countertop overhang minus 1 inch, and target rim height of 34‑36 inches. Then match any sink you like to those three constraints. If it fits all three, you’ve hit the standard. If one number is off, note which dimension you’d need to adjust – maybe a deeper overhang or a slightly narrower vanity.
Running this quick sanity check on your phone while you browse can stop a costly return before it happens.
What common mistakes cause people to ignore the “bathroom sink sizes standard”?
One big one is forgetting the countertop thickness. People measure the countertop surface to the floor, then add the bowl height, but they skip the extra inch or so that the slab adds. That pushes the rim too high, making the sink feel awkward. Another slip is buying a sink that’s exactly the vanity width, leaving no side clearance – water will splash onto the cabinets.
Lastly, many overlook faucet arc clearance. A high‑arc faucet needs a deeper bowl; otherwise the spout hits the rim and you end up with a constant splash zone. Double‑checking those three details keeps you safely inside the standard.


Leave a comment