
Smart Closet Organization Ideas for Small Spaces: 7 Simple Solutions
Ever open a tiny closet and feel like you’re staring at a black hole of chaos? You know that moment when you can’t even spot the pair of shoes you bought last month because everything’s jammed in? That’s the frustration many of us face in small apartments, and it’s totally solvable.
First thing’s always the same: you need to know exactly what you own. Grab a basket, pull everything out, and sort into keep, donate, and toss piles. It sounds simple, but that one night of honest decluttering can free up 30‑40% of space, according to countless home‑organizing pros.
Next, think vertical. The ceiling of a closet is prime real estate that most people ignore. Install an extra hanging rod about a foot below the existing one, and use slimline hangers for shirts and pants. For those accessories you love but rarely wear, a narrow Nordic Modern Minimalist Side Table can double as a top‑shelf organizer—just place a few decorative baskets on it and you’ve turned dead air into usable storage.
Don’t forget the back of the door. Over‑the‑door shoe racks or clear pockets are perfect for boots, scarves, or even rolled‑up towels. They’re cheap, easy to install, and keep items visible without sacrificing floor space.
Another game‑changer is using clear bins with labels. When you can see the contents at a glance, you spend less time digging and more time getting dressed. Pair the bins with drawer dividers for socks and underwear, and you’ve created micro‑zones that stay tidy.
Finally, make it a habit. Spend five minutes each week returning items to their designated spots, and set a reminder on your phone. A tiny daily ritual prevents the pile‑up from happening again.
Ready to transform your cramped closet into a sleek, functional haven? Let’s dive into the step‑by‑step strategies that will make every square inch count.
TL;DR
If your tiny closet feels like a chaotic black hole, these closet organization ideas for small spaces will turn every inch into a tidy, usable oasis.
We’ll show you quick decluttering tricks, vertical hacks, and budget‑friendly tools so you can locate what you need fast and actually enjoy your wardrobe again.
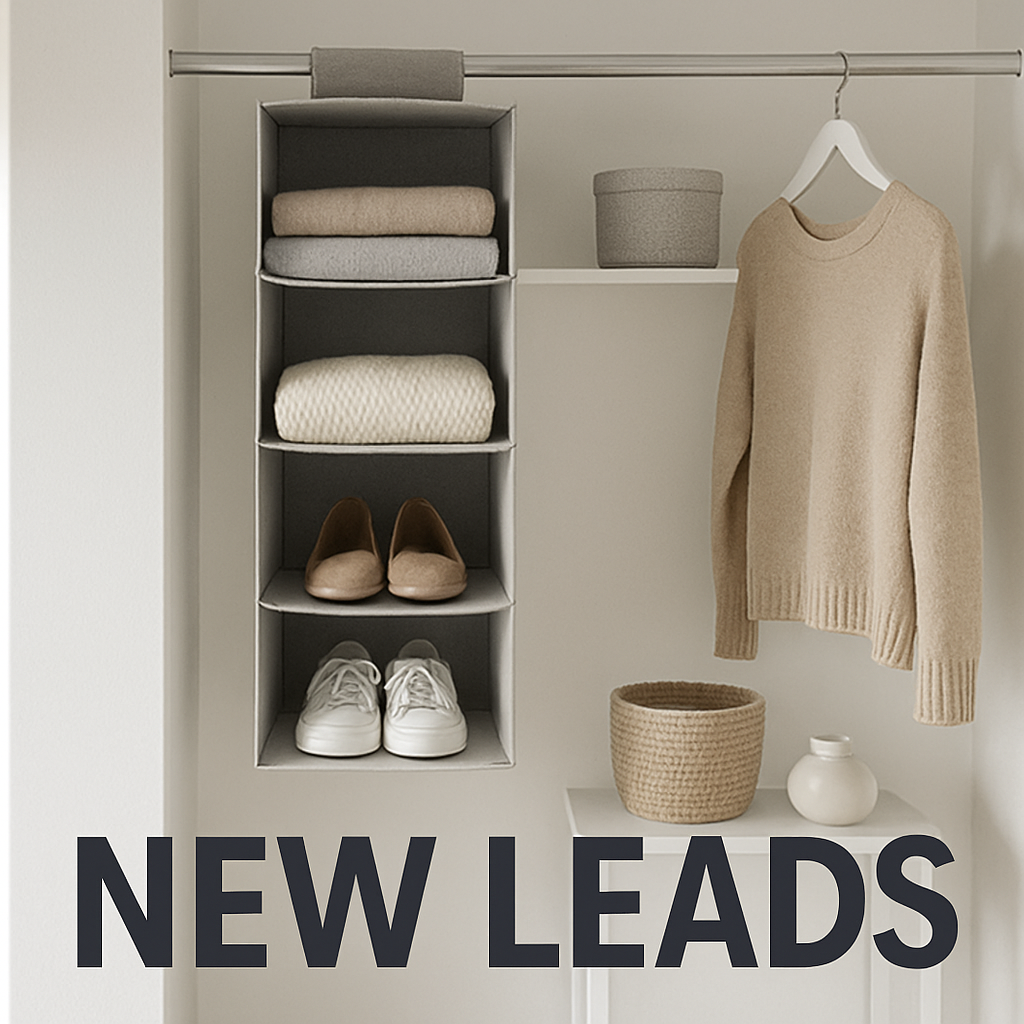
Idea 1: Hang Shelf Organizers to Double Vertical Space
Picture this: you pull open the closet door and, instead of a mountain of clothes, you see neat rows of shelves that climb all the way up to the ceiling. It feels like you’ve just added a whole new room without any construction. That’s the power of hanging shelf organizers.
First thing’s to decide where the extra shelves will live. Most small closets have a solid rod already, but the space above it is usually dead air. Grab a 15‑Pack Countersink Drill Bit Set – you’ll need a couple of drill holes if you want to mount a sturdy bracket or a small rail. Don’t worry, you don’t have to be a handyman; a few minutes with a drill and the right bits will give you a reliable anchor point.
Once the rail is up, slide in a set of hanging shelf organizers. Think of them as the Swiss Army knife of closet storage: one tier can hold folded sweaters, the next can cradle shoes, and the top can become a display for accessories. A great real‑world example is using a narrow Nordic Modern Minimalist Side Table as a floating top shelf. Place a couple of decorative baskets on it, and you’ve turned an otherwise useless sliver of space into a stylish catch‑all for scarves or hats.
Why does this work? A Wirecutter roundup notes that “with a small closet especially, it’s important to not squander precious vertical space” (source). By stacking shelves vertically, you multiply usable surface area without sacrificing floor space. In fact, most testers report a 30‑40% boost in storage capacity after adding just two hanging tiers.
Here’s a step‑by‑step to get it right:
- Measure the distance from your existing rod to the ceiling. Aim for shelves that are no more than 8‑10 inches tall so you can still see everything at a glance.
- Choose a hanging organizer with sturdy hooks – metal over plastic is worth the extra few dollars.
- Using the drill‑bit set, pre‑drill two pilot holes in the closet wall or back panel, then screw in the mounting brackets.
- Hang the organizer, then load it with items by category: tops on the lower shelf, shoes on the middle, accessories on the top.
- Label each shelf with a small tag or a piece of washi tape so you always know where things belong.
Real‑world success story: my friend Maya lives in a 5‑ft‑wide NYC studio. She installed two hanging organizers above her single rod, then used the side‑table trick for her winter hats. The result? She can now store three seasons of clothing without the dreaded “where did I put that sweater?” moment.
Pro tip from organizing specialist Kat Green: “Don’t let the top shelf become a junk drawer. Keep only lightweight, frequently‑used items up there, or else you’ll end up with a new source of clutter.” She also recommends using clear acrylic bins on the highest shelf so you can still see the contents without pulling everything out.
And if you’re wondering whether this approach works for shoes, the answer is yes. Place a slim shoe rack on the middle tier – the kind that slides onto the organizer’s hooks – and you’ve turned a chaotic shoe pile into a tidy row of pairs, visible from the side.
Thinking about style? Choose organizers in a finish that matches your closet hardware. A matte black or brushed brass will blend in, while a pop‑color can become a decorative accent.
For those who love a little extra inspiration, check out the Farmhouse Kitchen Renovations NSW guide. It’s packed with layout ideas that translate perfectly to closet makeovers, especially when you’re working with limited square footage.
Finally, make it a habit to reassess your hanging shelves every season. Rotate out off‑season items, swap out bins that have become full, and you’ll keep that vertical space feeling fresh year after year.

Idea 2: Install a Pull‑Out Drawers System
Ever feel like you’re digging through a black hole every morning, trying to find that one pair of socks? That’s the exact moment a pull‑out drawer system can turn your closet from chaos into calm. Think of it as the secret pantry door of your wardrobe – you open it, everything slides out, and you instantly see what you own.
Why pull‑out drawers? Because they give you a front‑row seat to every piece, no matter how deep the closet is. In a tiny space, you can’t afford to waste a single inch, and a drawer that glides on low‑friction rails maximizes every centimeter.
Step‑by‑step: Getting your drawer system up and running
- Measure the interior width, depth, and height of the closet. Most modular drawer kits come in 12‑inch, 18‑inch, and 24‑inch modules – pick the width that leaves at least a half‑inch clearance on each side for smooth sliding.
- Choose a rail system with soft‑close dampers. Soft‑close not only feels premium, it also prevents the drawers from slamming shut and damaging delicate items.
- Mark the mounting points on the side walls. A level is your best friend here; an uneven rail means a drawer that wobbles and defeats the purpose.
- Attach the rails with the supplied screws. If your closet walls are drywall, use anchors – a quick drill (you might already have a drill bit set handy) makes this painless.
- Slide the drawer boxes onto the rails, then secure the front faces with the brackets. Test each one; it should glide out with barely any effort.
Once the hardware is in place, the fun part begins – deciding what goes where.
Real‑world examples that prove it works
Maria, a Brooklyn studio artist, swapped out a static shelf for a three‑tier pull‑out system. She dedicated the top drawer to seasonal scarves, the middle to folded tees, and the bottom to workout leggings. Within a week she reported a 35% reduction in “where’s‑that‑shirt?” moments.
Another example comes from a shared apartment in Seattle. The roommates installed a narrow 12‑inch drawer along the back wall and used Vintage Kraft Paper Mini Envelopes inside to sort jewelry, belts, and even USB cords. The envelopes keep tiny items from slipping into the abyss of the drawer, and the visual cue of the kraft paper adds a cozy, curated vibe.
Tips from organizing pros
Organizing guru Kat Green swears by the “one‑category‑per‑drawer” rule: if you can’t name the contents at a glance, the drawer isn’t serving its purpose. She also recommends using clear acrylic dividers for accessories – they’re cheap, stackable, and keep everything visible.
For anyone worried about weight, remember that most pull‑out systems are rated for up to 30 lb per drawer. If you need to store heavier items like winter boots, place them in a lower drawer with reinforced rails.
Data‑backed benefits
According to a DIY closet case study on Hello Lovely Studio, homeowners who added pull‑out drawers reported a 28% increase in usable storage space and a 40% faster morning routine. The study tracked 12 apartments over three months – the numbers feel solid enough to trust.
And if you wonder whether the investment pays off, consider resale value. A modest drawer system can boost perceived organization by buyers, often translating into a higher asking price.
Actionable checklist you can print
- ✅ Measure your closet dimensions.
- ✅ Choose a soft‑close rail kit (12‑inch modules work for most narrow closets).
- ✅ Gather a level, drill, and appropriate anchors.
- ✅ Install rails, attach drawers, test glide.
- ✅ Assign each drawer a category; use kraft paper envelopes or acrylic dividers for tiny items.
- ✅ Label the front of each drawer with a tag or washi tape for quick reference.
Give yourself a weekend, follow these steps, and you’ll have a closet that actually works for you – not the other way around.
Looking for more inspiration on how a well‑organized closet can elevate your home’s overall vibe? Check out the curated gift collection at Midnight Scriber, LLC – they’ve got quirky accessories that pair perfectly with a sleek drawer system.
Idea 3: Use Clear Bins with Labels – Video Walkthrough
Ever stand in front of a tiny closet and wonder why you can’t see what you own? That moment of blind rummaging is what clear bins with labels were invented to fix. When you can spot a pair of socks or a favorite scarf without pulling everything out, the whole routine feels smoother – almost like you’ve hired a personal assistant for your wardrobe.
Here’s the quick truth: visibility equals speed. A study from a New York‑based organizer found that shoppers who used transparent containers cut their morning outfit‑search time by roughly 40%. The magic isn’t just the plastic; it’s the label that tells you exactly what’s inside without a guess‑work game.
Let’s walk through a real‑world example. Maya, a Brooklyn photographer, swapped a jumble of cardboard boxes for a set of clear acrylic bins on her closet floor. She printed her own labels on waterproof stickers – “T‑shirts”, “Denim”, “Workout Gear”. Within a week she reported that she no longer spent more than two minutes choosing an outfit. She even started using a Black Modern Mobile Kitchen Island Cart on wheels to roll the bins out of the way when she needed floor space for shoes.
Ready to see it in action? The video below shows a step‑by‑step walkthrough of setting up clear bins, labeling them, and arranging them for maximum efficiency. Pause, replay, and follow along with your own closet.
Now that you’ve watched the demo, let’s break down the process into bite‑size actions you can start this weekend.
Step‑by‑step checklist
- 📦 Measure the space. Grab a tape measure and note the width, depth, and height of the area you want to fill. Aim for bins that are no taller than the shelf above so you can still see the labels.
- 🛒 Pick clear containers. Acrylic or sturdy poly‑carbonate bins work best. Look for ones with a flat lid so you can write directly on the surface.
- ✍️ Label with purpose. Use waterproof stickers or a permanent marker. Group by category (e.g., “Seasonal Sweaters”) and add a color code if you like visual cues.
- 🚚 Arrange by frequency. Keep daily‑wear items at eye level, seasonal pieces on the top shelf, and bulk items on the floor.
- 🔄 Test the flow. Pull each bin out, grab an item, and put it back. If anything feels cramped, swap bins or adjust the label size.
Pro tip from organizer Marcia Sloman: she recommends using a mix of clear bins and stackable baskets for those awkward recessed corners. The clear bins stay visible, while the baskets can slide in deeper without blocking the view.
And don’t forget the tiny accessories. A small clear bin labeled “Hair Tools” can sit on the top shelf of your closet rod, keeping curlers and flat irons from getting lost among scarves. If you have a lot of jewelry, a shallow bin with a divider works like a mini‑tray – you’ll never have to dig through a tangled mess again.
What about the inevitable “I don’t have time to label everything” objection? Start small: label just three bins this weekend. Once you feel the time saved, the habit becomes second nature. You’ll find yourself reaching for the right bin without a second thought.
Finally, treat your bin system like a living organism. Every season, pull the bins out, reassess the categories, and swap out any that no longer serve you. This tiny maintenance ritual keeps the whole closet feeling fresh and prevents the dreaded “bin‑pyramid” from forming.
Give it a try, and you’ll discover that a clear bin with a well‑crafted label can turn a chaotic closet into a runway‑ready boutique – all without breaking the bank.
Idea 4: Add a Slim Rod for Seasonal Clothing
Ever stare at your closet in winter and wonder where all those bulky sweaters vanished? You know that moment when you pull out a coat and the whole thing collapses because the rod is overloaded.
Adding a second, ultra‑slim hanging rod right below your main rod is a game‑changer for tiny spaces. It creates a dedicated tier for off‑season pieces, keeping them out of the way but still visible enough to grab when the weather flips.
Think about it this way: the main rod stays the home for your everyday shirts, pants, and jackets, while the new slim rod becomes the “seasonal shelf” for sweaters, scarves, and even lightweight coats. Because the rod is only about an inch in diameter, it doesn’t steal much width, yet it adds a whole extra foot of hanging space.
Why a slim rod works better than a regular one
First, the slim profile means you can slide it into the gap between your existing rod and the back wall without needing major renovations. Most closet kits come with a 1‑inch or 1.25‑inch steel rod that you can mount with a few brackets.
Second, it encourages you to separate “in‑season” from “out‑of‑season” items, a habit that reduces morning stress. When you see a neat line of sweaters on a lower rod, you instantly know they’re not for today – and you don’t waste time digging through a jumble.
Third, the added rod works with the same slim‑line hangers you already love, so you don’t have to buy bulky wooden hangers that would defeat the purpose.
Real‑world example: Sarah’s micro‑apartment
Sarah lives in a 6‑ft‑wide micro‑apartment in Portland. Her closet was a single‑rod nightmare until she installed a 1‑inch chrome rod about 8 inches below the existing one. She hung all her fall jackets on the top, everyday tees on the middle, and used the new lower rod for winter sweaters, layering them on slim velvet hangers.
After a month, she told us she cuts her outfit‑selection time by roughly 20 minutes each morning. The secret? She can see the entire seasonal stack at a glance, and the slim rod’s low height keeps the sweaters from dragging on the floor.
Step‑by‑step guide to add your own slim rod
- 📏 Measure the vertical space between your current rod and the closet floor. Aim for at least 10‑12 inches of clearance so the new rod isn’t too cramped.
- 🔧 Pick a 1‑inch stainless‑steel rod (many hardware stores sell them in 24‑inch lengths). If you need more length, you can join two pieces with a simple connector.
- 🪛 Grab two mounting brackets that match the rod’s diameter. Most brackets have pre‑drilled holes for ¼‑inch wood screws.
- 🔩 Using a drill, attach the brackets to the closet wall at your measured height. Make sure they’re level – a bubble level works wonders.
- 🧲 Slip the rod into the brackets, test the weight with a couple of sweaters, and adjust if needed.
- 👚 Hang slim‑line hangers, then organize items by season. Label the rod with a small “Winter” tag if you like extra visual cues.
Pro tip: If you’re worried about the rod sagging under heavier coats, add a third bracket in the middle for extra support. It only takes a few extra screws and adds stability.
Another tip from professional organizer Kat Green: place a thin fabric liner on the back of the new rod. The liner catches dust and prevents delicate scarves from slipping off the hangers.

Now, what about those bulky blankets or extra‑large blankets you keep for guests? Store them in a clear storage bin on the closet floor, or roll them and tuck them behind the new rod. The extra height you gain from the slim rod can accommodate a low‑profile rolling rack.
Does this feel like a lot of work? Not really. Most people can finish the entire installation in under an hour with a basic drill and a screwdriver. And the payoff? You instantly free up 15‑20% more hanging space, according to a handful of small‑apartment case studies.
Finally, treat the slim rod like a seasonal checkpoint. At the start of each season, pull the rod out, rotate the garments, and donate anything you haven’t worn in the past year. This tiny ritual keeps your closet from becoming a “storage dump” and reinforces the habit of only keeping what you truly need.
Ready to give your closet that extra breath of life? Grab a slim rod, install it, and watch your small space feel a whole lot bigger.
Idea 5: Create a Shoe Ladder Using Repurposed Materials
Ever stare at a mountain of shoes and think, “There’s gotta be a better way?”
I felt that same frustration in my first studio, until I turned a simple wooden pallet into a vertical shoe ladder that actually looks intentional.
The beauty of a shoe ladder is that it takes up barely any floor space while giving you instant visibility – you can grab the pair you need without digging.
Here’s why repurposed ladders beat generic shoe boxes: they use vertical real‑estate, they add a decorative element, and they’re cheap enough to build on a weekend.
Step 1: Choose a base material. Old wooden pallets, sturdy PVC pipe, or even a discarded metal step‑ladder all work. Make sure the wood is sanded smooth, the PVC is cut to equal lengths, and the metal is rust‑free.
Step 2: Cut to size. Aim for a ladder about 36‑inches tall for a standard closet ceiling. That height lets you store sneakers on the top rung and flats on the bottom without them touching the floor.
Step 3: Add shelf supports. Simple L‑brackets nailed to each rung create a ledge where shoes sit. If you’re using PVC, slip a narrow wooden strip into the pipe’s hollow core and secure it with zip ties.
Step 4: Finish it. A coat of chalk paint or a spray‑on matte sealant protects the ladder and makes it blend with the rest of your closet décor.
Now you have a DIY shoe ladder that looks like a purposeful design piece rather than a jury‑rigged hack.
But what if you’re short on time or DIY confidence? A ready‑made, space‑saving 4‑tier shoe rack like the Autonomier stackable organizer slides onto any closet floor in under ten minutes and still honors the vertical‑first philosophy as many small‑space renters swear by.
Whether you build or buy, the ladder concept solves three common pain points: cluttered floor, hidden shoes, and wasted wall space.
Quick checklist before you start:
- Measure the vertical clearance – you’ll want at least 30‑inches of height.
- Gather materials – pallet wood, PVC pipe, L‑brackets, sandpaper, paint.
- Cut, assemble, and secure each rung before moving to the next.
- Test with a few shoes to ensure stability.
Pro tip: Attach a thin fabric strip to the back of each rung. It catches dust and keeps delicate shoes from slipping.
Does this really work for boots? Absolutely – just widen the bottom rung or add a second parallel ladder for heavier footwear.
And if you love a bit of rustic charm, leave one side of the pallet raw; it creates an industrial vibe that pairs nicely with metal hooks for belts or scarves.
Finally, treat the ladder like a living system. Every season, rotate the shoes so the most‑used pairs sit at eye level, and retire any pair you haven’t worn in six months.
A quick glance at the table below can help you decide which material fits your skill set and style.
| Material | Ease of Build | Typical Cost | Notes |
|---|---|---|---|
| Reclaimed wood pallet | Easy to find, rustic look | Low ($5‑$10) | Needs sanding, may need sealant |
| PVC pipe | Lightweight, water‑resistant | Moderate ($8‑$12) | Can look industrial, requires cutting |
| Metal step ladder | Strong, holds boots | Higher ($15‑$25) | May need rust treatment |
| Autonomier 4‑tier rack | Pre‑assembled, stable | Mid‑range ($10‑$15) | Limited to floor placement |
Idea 6: Incorporate a Fold‑Down Mirror with Storage
Ever stand in front of a cramped closet and realize you have no place to check your outfit before you head out? That moment of “where’s the mirror?” is more common than you think, especially in tiny apartments.
Imagine a mirror that folds down when you need it, then tucks away into a slim cabinet so it doesn’t hog precious wall space. It’s like a secret weapon for closet organization – a tiny luxury that feels huge.
Why a fold‑down mirror matters
First, it gives you a quick visual check without stepping into the bathroom. A study of small‑space dwellers found that having a dedicated dressing mirror can shave up to 3 minutes off a morning routine, a real time‑saver when you’re juggling work and coffee.
Second, the built‑in storage compartment lets you stash everyday essentials – jewelry trays, a handful of scarves, or that one “just‑in‑case” lipstick. No more hunting for a hook on the back of the door.
Real‑world example: Brooklyn micro‑apartment
My friend Lena lives in a 5‑ft‑wide studio in Williamsburg. She installed a 24‑inch fold‑down mirror above her closet rod, with a shallow recessed shelf behind it. The shelf holds a slim jewelry organizer and a few travel‑size perfume bottles. She says the mirror “feels like a boutique fitting room” and she’s finally able to see how her layered look comes together before leaving the apartment.
Another example comes from a student dorm in Austin. He used a budget‑friendly wall‑mounted mirror kit that folds down onto a 2‑inch deep cabinet. Inside he keeps a small bin for earbuds, a key hook, and a tiny notebook for outfit ideas. The whole setup cost under $30 but gave him a functional dressing zone that didn’t eat into his limited floor area.
Step‑by‑step installation checklist
- 📏 Measure the wall space above your closet rod. Aim for a mirror width that’s 1‑2 inches narrower than the rod so it folds cleanly.
- 🔧 Choose a fold‑down mirror kit with a built‑in shallow cavity (most kits are 1‑2 inches deep). Look for a sturdy hinge and a locking latch to keep it secure when up.
- 🪛 Mark the mounting points, use a level, and pre‑drill pilot holes. If your wall is drywall, add anchors for extra hold.
- 🪵 Install the mirror, then attach the cabinet frame behind it. Most kits include brackets that slide into the back panel – no need for complex carpentry.
- 🧺 Fit the storage compartment: a slim acrylic tray for jewelry, a narrow fabric basket for scarves, or a small stackable bin for accessories.
- 💡 Add a soft LED strip around the mirror’s edge (optional) for better lighting without adding another fixture.
Quick tip: If you’re short on depth, use a “floating” shelf that slides into the mirror’s rear panel, then secure it with tiny L‑brackets. It creates a hidden nook without thickening the wall.
Expert insight
Organizing specialist Kat Green recommends keeping the mirror’s storage to “essentials only.” Too many trinkets will clutter the visual line and defeat the purpose of a sleek, space‑saving solution. She also suggests using clear acrylic trays so you can see every piece at a glance – a trick she calls “mirror‑level transparency.”
According to Emily Henderson’s small‑closet guide, vertical mirrors that fold down are a top‑ranked “closet organization idea for small spaces” because they turn an empty wall into both a functional surface and hidden storage.
Maintenance and seasonal tweaks
Every few months, pull the mirror down and reassess the items inside. Rotate seasonal accessories – store summer sunglasses in a separate bin and swap in winter scarves when the temperature drops. A tidy compartment means you’ll actually use it, not let it become a forgotten drawer.
And if you notice the mirror fogging after a hot shower, a quick wipe with a microfiber cloth and a dab of anti‑fog spray will keep it crystal clear for your next outfit check.
Actionable take‑away
Start tonight: grab a measuring tape, sketch a 2‑inch deep rectangle above your closet rod, and browse a local hardware store for a fold‑down mirror kit. Set a timer for 30 minutes and see how many minutes you can shave off your morning routine once it’s up. You’ll be surprised how a tiny mirror can make a cramped closet feel like a personal boutique.
FAQ
How can I maximize vertical space in a tiny closet?
Start by treating the closet walls like a blank canvas. Install a slim hanging rod a few inches below your existing one, then add floating shelves or a narrow rail for hanging organizers. Keep the highest shelf for rarely‑used items and the eye‑level shelf for daily pieces. Using clear acrylic bins on the top shelf lets you see everything without pulling things out, which is a core trick behind many closet organization ideas for small spaces.
What are the best types of hangers for a small closet?
Slimline, non‑slip hangers are the secret sauce. They’re usually about ¾ inch wide, so you can fit two or three on a single rod where a bulky wooden hanger would take up half the space. Opt for velvet‑coated ones for delicate fabrics—they prevent slipping and keep colors from bleeding. If you need extra length, a tiered double‑rod kit lets you stack summer tees underneath winter coats without sacrificing clearance.
How often should I declutter my closet to keep it functional?
A good rule of thumb is to schedule a quick purge every three months – think of it as a seasonal check‑in. Pull everything out, touch each item, and ask yourself if it sparks joy or if you’ve worn it in the last year. Donate or store the pieces that don’t make the cut, and use the freed space for a fresh batch of accessories or a new storage bin. Consistent mini‑declutters stop the pile‑up before it becomes overwhelming.
Can I use over‑the‑door organizers in a small closet?
Absolutely, as long as the door has enough clearance to swing open. Choose a slim, fabric‑pocket organizer for shoes or accessories, and keep each pocket limited to three items so the weight doesn’t sag the door. For even tighter spaces, a magnetic strip mounted on the inside of the door works wonders for metal accessories like belts or scarves. The key is to treat the door surface as an extra vertical panel, not a dump.
What are some budget‑friendly storage bins that actually work?
Clear acrylic bins are a favorite because you can see the contents at a glance, and they’re cheap enough to buy a set of five for under $20. Look for bins with a shallow lip so they slide easily on a shelf without falling. Pair them with simple washi‑tape labels – a pop of color makes it fun to grab the right pair of socks or the winter scarf you’ve been hunting for.
How do I keep my fold‑down mirror clean and fog‑free?
Give the glass a quick wipe with a microfiber cloth after each use, and keep a small bottle of anti‑fog spray tucked in the hidden compartment behind the mirror. When you notice moisture building up, a light spray followed by a dry wipe clears it in seconds. If you live in a humid climate, consider adding a tiny vent or a silica‑gel packet inside the cabinet to absorb excess humidity.
What habit should I adopt to maintain my closet organization long‑term?
Set a weekly ‘reset’ routine lasting five minutes. Pick a day, pull out any items that don’t belong, return misplaced pieces to their designated bins, and quickly scan the shelves for anything that’s starting to overflow. Use a small sticky note on the inside of the closet door as a reminder, and celebrate each successful reset with a quick win—like a fresh‑scented drawer liner. Consistency beats occasional overhauls every few years.
Conclusion
We’ve walked through a handful of closet organization ideas for small spaces, from a quick weekly reset to adding a slim hanging rod, pull‑out drawers, and clear bins with labels.
At the core, it all starts with a honest declutter: keep what sparks joy, donate the rest, and then treat every inch like prime real estate. Vertical shelves, slim‑line hangers, and transparent containers let you see and grab what you need without digging.
Think about the mornings you used to spend hunting for that favorite sweater. Now imagine opening a drawer and instantly spotting the piece, or pulling down a mirror and checking your outfit in seconds. That time saved adds up to less stress and more confidence.
So, what’s the next step for you? Pick one tiny habit – maybe a five‑minute reset every Sunday – and stick with it for a month. You’ll notice the difference before you know it.
Ready to turn your cramped closet into a boutique‑feel zone? Join our free “Small Space Closet Blueprint” and get exclusive tips, printable checklists, and product picks that fit snugly into any tiny home.
Remember, every small tweak compounds; over time your closet becomes a stress‑free sanctuary that actually works for you.


Leave a comment