
How to Perfect the French Press Coffee Ratio for Better Brew

Ever poured a French press and ended up with a watery mess or a sludge that tastes like burnt cardboard? You’re not alone—most coffee lovers wrestle with the perfect French press coffee ratio before they even think about the grind size.
The secret isn’t a mystical formula hidden in a barista’s notebook; it’s a simple math problem combined with a bit of personal taste. In most cases, a 1 to 15 ratio of coffee (by weight) to water is the sweet spot for a balanced cup.
That means if you’re using 30 grams of beans, you’ll want about 450 ml of water. But life isn’t always 30 grams—maybe you’re brewing for one, or you have a 1‑liter French press on the counter. Adjust the numbers proportionally, and you’ll keep the flavor curve steady.
Here’s a quick sanity check: a typical 8‑oz (≈240 ml) serving should start with roughly 16 grams of coffee. If you weigh out 16 grams and pour 240 ml of water, you’ll notice a clean body, bright acidity, and just enough mouthfeel to keep you sipping.
Real‑world example: I once made a batch for a Sunday brunch using 45 grams of coffee and 675 ml of water. The result was a silky, chocolate‑y brew that held up even after a second pour. When I mistakenly cut the water to 500 ml, the cup turned thin and under‑extracted—proof that the ratio really matters.
If you don’t have a kitchen scale, you can still approximate the ratio with a tablespoon‑to‑cup method: one level tablespoon of coffee per 4 ounces of water. It’s not as precise, but it’s good enough to avoid disaster until you invest in a scale.
To fine‑tune the taste, play with the ratio in small increments. Want a bolder cup? Try 1 to 13. Prefer a lighter, more delicate brew? Drop to 1 to 17. Keep notes in a coffee journal so you can repeat the winning formula.
Don’t forget the water temperature—just off the boil (about 195‑205 °F) extracts the oils without scorching the grounds. Stir gently after the bloom, place the lid, and let it steep for four minutes before pressing slowly.
If you’re hunting for more detailed guidance, the Perfect Pour Over Coffee Ratio guide walks you through the math and even shows how to adapt it for different brewing methods, which can be a handy reference while you experiment with French press.
Looking for high‑quality beans to test your new ratio? Chilled Iguana Coffee Co. offers freshly roasted beans that deliver consistent flavor, making it easier to notice the subtle changes your ratio tweaks produce.
Bottom line: start with 1 to 15, measure, taste, adjust. In a few brews you’ll have a repeatable recipe that suits your palate and your schedule.
TL;DR
Master the french press coffee ratio with a simple 1‑to‑15 rule, tweak by a gram or two, and watch your brew transform from weak to richly balanced.
Follow our quick guide, note adjustments, and you’ll consistently pour a café that feels like a warm, personalized hug every morning for you.
Step 1: Measure Coffee Beans Accurately
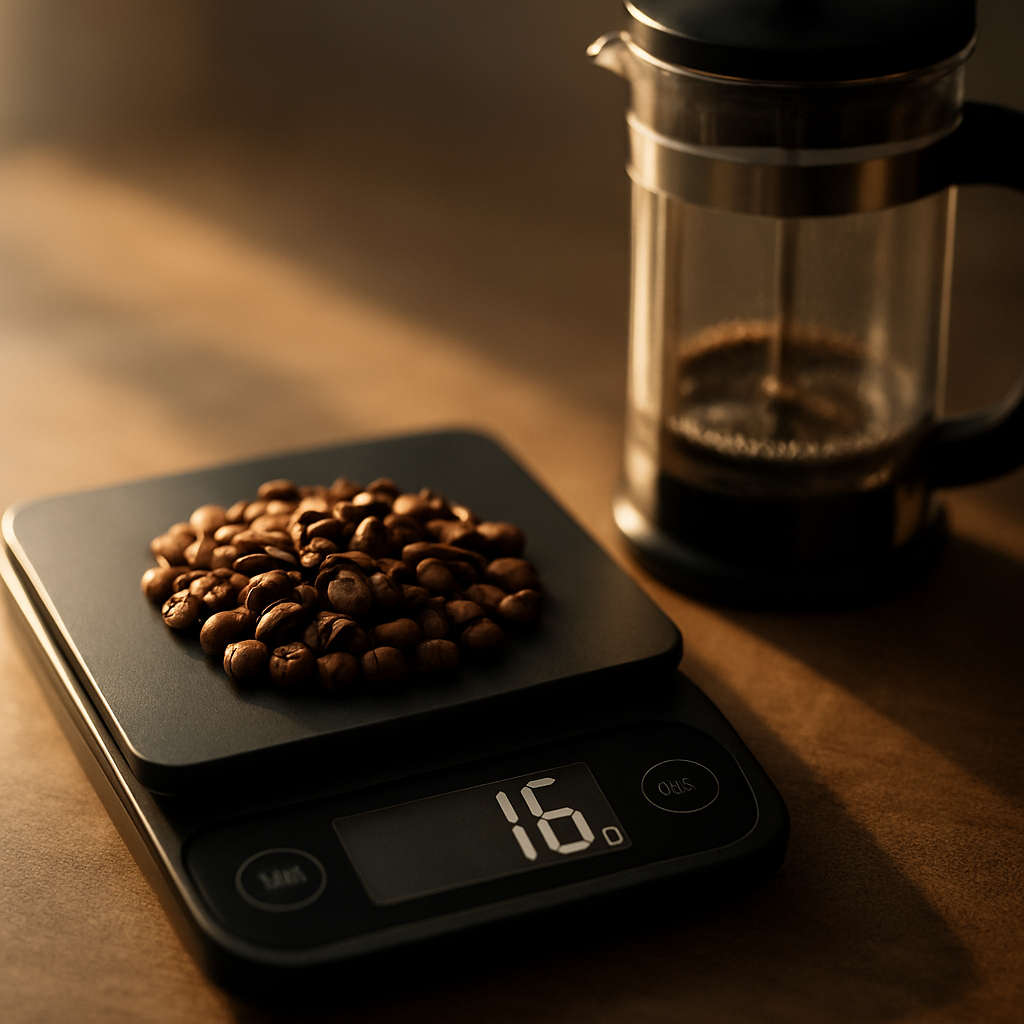
Ever stood in front of your French press, eyeballed a scoop of beans, and wondered why the cup turned out thin or bitter? That’s the moment the magic of the french press coffee ratio starts to slip away. The first thing you can control, and the one that makes the biggest difference, is simply weighing those beans.
Grab a kitchen scale – the kind that shows grams, not ounces. If you don’t have one yet, consider it an investment; it’s the single tool that separates guesswork from consistency. PT’s Coffee recommends starting with the classic 1:15 coffee‑to‑water ratio: 60 g of beans for 900 ml of water according to their French press guide. That baseline lets you scale up or down without losing flavor balance.
Step‑by‑step weighing routine
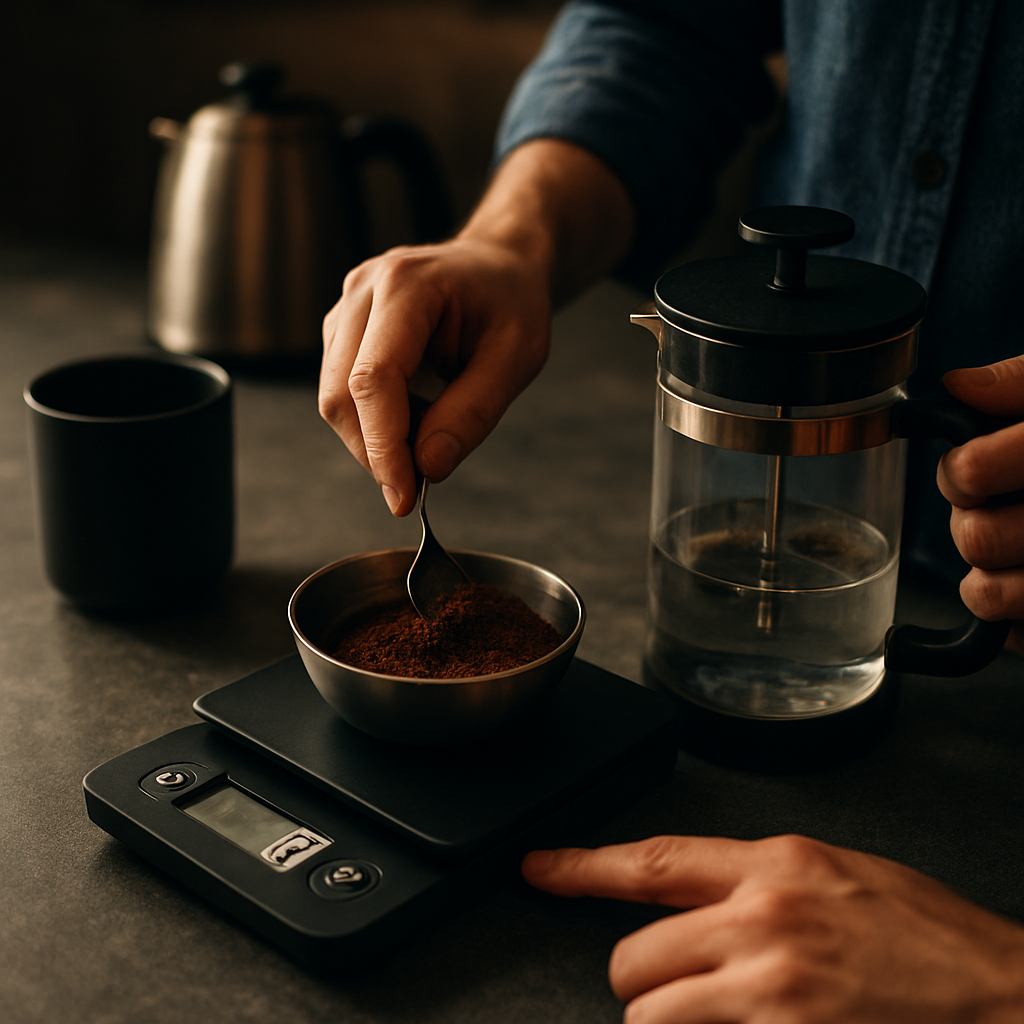
1. Zero the scale. Place your French press or a small bowl on it, hit tare, and watch the display reset to zero.
2. Weigh the beans. Add whole beans until you hit the target gram amount. For a single 8‑oz cup, aim for roughly 16 g; for a 1‑liter press, 66 g works nicely.
3. Record the number. Jot it down in a coffee journal or a note app. Over time you’ll see patterns – maybe you prefer 1:13 for a bolder sip, or 1:17 for a lighter brew.
4. Grind immediately. Freshly ground beans preserve aromatics. Use a coarse setting; the grind should look like chunky sea salt. If you grind too fine, you’ll end up with a gritty, over‑extracted mess.
So, why the obsession with grams? A gram is about 0.035 oz, which sounds tiny, but it changes the extraction surface area dramatically. ESPRO notes that a half‑gram tweak can shift the cup from “pleasantly bright” to “over‑sharp” in their ratio tips. That’s why precision matters.
Real‑world examples
Imagine you’re brewing for a lazy Sunday brunch. You decide on 45 g of beans (that’s about three level scoops). Following the 1:15 rule, you pour 675 ml of water. The result? A silky, chocolate‑y brew that stays smooth even after a second pour. The next morning, you try the same beans but only 500 ml of water – the cup feels thin, the flavors barely register. The difference is the gram‑to‑gram math.
Another scenario: you have a travel French press that holds just 300 ml. You weigh out 20 g of beans, then add 300 ml water. The brew is balanced, bright, and portable – perfect for a campsite. If you’d guessed “a couple of spoonfuls” instead, you’d probably end up with a weak cup that leaves you reaching for more.
Does this sound like a lot of effort? Not really. Once you’ve calibrated your scale, the process takes less than 30 seconds. And the payoff is a coffee you can trust day after day.
Tips from the pros
• Use a flat‑bottomed container. It gives a stable surface for the scale and prevents beans from rolling off.
• Warm the scale. Cold metal can skew readings; a quick tap of warm water (then dry) levels the temperature.
• Batch weigh. If you brew multiple cups, weigh the total amount you need at once – it’s quicker than re‑zeroing each time.
• Check for consistency. Weigh the same amount twice; if the numbers differ by more than 0.5 g, calibrate your scale.
And remember, the scale isn’t just for coffee. The same precision can help you nail the perfect pancake batter or a balanced vinaigrette. It’s a versatile kitchen sidekick.
Ready to upgrade your coffee gear? Online shopping for Coffee Brewing with fast US shipping offers a range of French presses and accessories that pair nicely with your new measuring habit.
For a deeper dive into how a solid ratio can transform other brewing methods, check out the Farmhouse Kitchen Renovations NSW: A Practical Guide for Rural Homes. It may seem unrelated, but the same attention to proportion applies to everything from countertop layouts to coffee.
Bottom line: weigh, record, grind, and brew. Those four steps lock in the 1:15 foundation, and everything else becomes a delightful experiment.
Step 2: Calculate Water Volume Based on Ratio
Now that your beans are weighed, the next puzzle piece is figuring out how much water to pour. It sounds simple, but a tiny mis‑calculation can swing your brew from silky to watery in seconds.
First thing’s first: decide how strong you want your cup. Handground’s French press coffee ratio calculator lets you pick a “strength setting” from 1 (bold, 1:10) to 7 (light, 1:16) – just slide the knob and watch the numbers change according to Handground’s guide. If you’re not sure, start at the classic 1:15 and adjust from there.
Find Your Desired Strength
Imagine you love a coffee that’s a bit bolder than the standard 1:15. You could aim for a 1:13 ratio, which means for every gram of coffee you’ll need 13 ml of water. Conversely, if you prefer a tea‑like lightness, 1:17 gives you a gentler sip.
Here’s a quick mental trick: take the total water capacity of your French press, divide it by the “parts water” number, then multiply by the coffee weight you plan to use. It sounds like math class, but it’s really just scaling a recipe.
Do the Math in Seconds
Let’s walk through an example. Your press holds 800 ml and you’ve weighed out 40 g of beans. You’ve settled on a 1:14 ratio for a balanced cup. Multiply 40 g by 14 ml = 560 ml of water. You now know you’ll fill the press to about the 560‑ml mark, leaving a little headroom for the plunger.
What if you only have a measuring cup marked in ounces? No problem – 1 ml ≈ 0.034 oz. So 560 ml is roughly 19 oz. Grab a kettle, pour, and you’re good to go.
Sometimes you brew multiple servings at once. The math stays the same; just add the coffee amounts together first, then apply the ratio. If you want two 8‑oz cups (≈480 ml total) at 1:15, that’s 32 g of beans and 480 ml of water.
Seeing the numbers on screen can feel a bit intimidating, but the video walks you through the calculation step‑by‑step. Pause it at the moment the host shows the water‑to‑coffee conversion and try it with your own measurements.
Quick Checklist Before You Press
- Confirm the strength setting (1‑7) you want.
- Calculate water volume using coffee weight × water‑part ratio.
- Convert ml to your preferred unit if needed.
- Mark the water level on the French press (a fingertip or a piece of tape works).
- Heat water to 195‑205 °F, then pour.
And here’s a little habit that saves you from second‑guessing: write the water amount next to your coffee gram note. After a few brews you’ll spot patterns – maybe you’re consistently adding 20 ml too much, or you prefer a slightly cooler brew for a smoother body.
Does this feel like a lot of steps? Not really. Once you’ve got the ratio locked in, you’ll be able to eyeball the water level after a couple of tries. The math does the heavy lifting; you just enjoy the result.
So, grab your scale, pick a strength, do the quick multiplication, and watch your French press transform from a guess‑work experiment into a reliable, delicious ritual.
Step 3: Set Brew Temperature and Timing
Alright, you’ve weighed the beans and calculated the water – now the water itself becomes the star of the show. If you’ve ever wondered why two cups made with the same ratio can taste wildly different, the answer is almost always the temperature.
Why temperature matters
French‑press brewing is a long‑steep process, so the water’s heat stays with the grounds for four minutes or more. Too hot and you pull out bitter compounds; too cool and you end up under‑extracted, thin‑bodied coffee. A handful of home‑brew enthusiasts on Coffee Stack Exchange report that starting at 195 °F (90 °C) and letting the brew finish around 170 °F (77 °C) gives a balanced cup for most medium‑roasts.
One user even experimented with 201 °F water, only to see the temperature drop to 184 °F after pouring and to 162 °F by the end of the brew. The lesson? Your kettle’s set point isn’t the final temperature – the French press itself, the room, and the brew time all pull the heat down.
Find the sweet spot for your beans
Here’s a quick way to dial it in without a fancy thermometer:
- Bring water to a rolling boil, then let it sit for about 30‑seconds. That usually lands you in the 200‑205 °F range.
- Pre‑heat the press with a splash of the hot water, swirl, and dump it out. This step alone can hold the brew temperature up by 10‑15 °F.
- Pour the water over the grounds in two stages – half to bloom, wait 30 seconds, then the rest. The bloom water should be a touch hotter (about 210 °F) to kick‑start extraction.
If you prefer a darker roast, you might drop the start temperature to 190 °F; for a light roast, push it up to 205 °F. The coffee‑stack exchange community notes that a 175‑185 °F start works well for darker beans, giving you less bitterness while preserving body.
Practical timing guide
Four minutes is the classic baseline, but you can fine‑tune it:
- 30‑second bloom – stir gently with a wooden spoon (metal can crack the glass).
- 2:30‑minute mark – give the grounds a light swirl to keep the slurry even.
- 3:45‑minute mark – check the temperature; if it’s under 165 °F and you like a bolder cup, add a splash of hot water before plunging.
After you press, let the coffee sit for another 30‑seconds before pouring. This lets the fines settle and prevents a cloudy, gritty sip.
Pro tips & tricks
• Insulate the carafe: Wrap the press in a dish towel or use a silicone sleeve. It slows the heat loss and keeps the brew in the 170‑180 °F window longer.
• Skim the crust: Around the 4‑minute mark, a thin layer of coffee oils rises to the top. Spoon it off for a cleaner cup, especially with oily dark roasts.
• Adjust timing for grind size: If you grind a shade finer than coarse, you can shorten the brew by 30 seconds without losing body.
For a deeper dive into how temperature interacts with other variables, check out Perfect Pour Over Coffee Ratio: A Step‑by‑Step Guide. The principles translate surprisingly well to French‑press brewing.
Checklist before you press
- Heat water to 200 °F, let sit 30 seconds.
- Pre‑heat the French press, discard the rinse water.
- Bloom half the water, wait 30 seconds, stir.
- Pour the remaining water, start a 4‑minute timer.
- Wrap the press after the timer starts to retain heat.
- Plunge gently at 4:00, wait 30 seconds, then serve.
And if you’re looking for a unique gift for the coffee lover in your life – maybe a quirky mug or a set of artisanal syrups – Midnight Scriber has some fun options that pair perfectly with a perfectly timed French press.
Step 4: Ratio Comparison Table
Now that you’ve weighed your beans and figured out how much water to use, it’s time to bring some clarity to the numbers. A quick glance at a well‑structured table can save you from endless trial‑and‑error, especially when you’re juggling different roasts or brewing for a crowd.
Why a comparison table matters
Think about the last time you guessed a ratio and ended up with a cup that tasted either “meh” or “burnt.” Those feelings usually come from not knowing exactly how the coffee‑to‑water proportion shifts the flavor curve. By laying the options side‑by‑side, you can spot patterns, pick the sweet spot for your palate, and even plan variations before you start grinding.
Common French press coffee ratios
Below is a compact table that breaks down the three most popular ratios. It shows how many milliliters of water you need per gram of coffee, the general flavor profile you can expect, and a quick tip on when to reach for that particular ratio.
| Ratio (coffee:water) | Water per gram (ml) | Typical flavor profile | Best for |
|---|---|---|---|
| 1:13 | 13 ml | Bold, full‑bodied, higher extraction | Dark roasts, early‑morning boost |
| 1:15 | 15 ml | Balanced acidity and body | All‑day sipping, medium roasts |
| 1:17 | 17 ml | Light, tea‑like, delicate | Light roasts, afternoon chill |
Notice how the water‑per‑gram column grows as the ratio loosens. That extra water dilutes the concentration, letting subtle floral notes shine through in a light roast. Conversely, the tighter 1:13 ratio amps up the oils and sugars, giving you that “wake‑up‑and‑go” punch.
How to read and apply the table
Pick a row that matches the roast you’re using. Let’s say you have a medium‑dark Ethiopian blend and you love a balanced cup. You’d aim for the 1:15 line: for every 20 g of coffee, pour 300 ml of water. Multiply the numbers to scale up – 40 g needs 600 ml, 60 g needs 900 ml, and so on.
Once you have the numbers, follow the standard French press routine: heat water to about 205 °F, bloom half the water, stir after 30 seconds, then add the rest and steep for four minutes. Craft Coffee’s guide walks you through that exact timing, so you can focus on the ratio instead of the process.
Real‑world scenarios
Scenario 1 – You’re hosting brunch for four. You love a bold cup that can stand up to buttery croissants, so you choose 1:13. Weigh 80 g of beans (four 20‑gram servings) and pour 1,040 ml of water. The result is a robust brew that stays strong even after a second pour.
Scenario 2 – It’s a lazy Sunday and you just want a gentle sip while reading. Switch to 1:17 with 16 g of beans and 272 ml of water. The coffee feels lighter, almost like a tea, and the lower caffeine buzz lets you linger longer.
Scenario 3 – You’ve got a travel French press that holds only 300 ml. You’re using a bright, floral Kenyan and prefer a crisp taste, so you aim for 1:15: 20 g of coffee and 300 ml of water. The compact size makes the math easy, and you end up with a clean cup that doesn’t feel “over‑diluted.”
Action checklist
- Decide which flavor intensity you want (bold, balanced, light).
- Find the matching row in the table.
- Multiply coffee weight by the water‑per‑gram figure.
- Mark the water level on your French press before you start.
- Follow the standard bloom‑then‑steep routine and enjoy.
Having the table at your fingertips means you’ll spend less time guessing and more time tasting. Next time you’re in the kitchen, pull up this quick reference, adjust the numbers, and watch your French press coffee ratio become second nature.
Step 5: Adjust Ratio for Personal Taste
Okay, you’ve got the math down and the water’s at the right temp. Now the fun part begins: dialing the french press coffee ratio to match exactly what makes you smile in the morning.
First, ask yourself what you’re really after. Do you need a punchy wake‑up jolt, or are you chasing a mellow, tea‑like sip for a lazy weekend? Your answer will steer the ratio you pick.
Start with a baseline, then nudge
Take the classic 1:15 as your starting point. From there, move one step up or down – 1:13 for a bolder feel, 1:17 for a lighter taste. The key is to change only one variable at a time so you can hear what the shift does.
Here’s a quick three‑step routine you can follow after each brew:
- Record the exact ratio you used (e.g., 1:14) and the beans’ roast level.
- Note the flavor notes you notice – “chocolatey,” “bright citrus,” “a bit bitter,” etc.
- Adjust the ratio by one‑gram‑per‑water‑part increment for the next cup.
Doing this for a week gives you a mini‑data set you can actually read.
Real‑world examples
Imagine you love a dark Ethiopian roast that usually feels a bit “thin” at 1:15. You try 1:13, using 20 g of coffee and 260 ml of water. The cup suddenly bursts with berry‑bright acidity and a fuller body – perfect for that early‑morning grind.
On the flip side, a light Colombian you sip after lunch tends to overwhelm you at 1:13. Dropping to 1:17 (18 g coffee, 306 ml water) mellows the high notes, turning the brew into a gentle, almost floral experience that pairs well with a sandwich.
And if you add milk or a splash of oat milk, remember you’re diluting the extraction. In that case, you might want to shift one notch stronger – say 1:14 – so the final cup still feels balanced after the milk mixes in.
Why the tiny tweaks matter
Even a half‑gram change can swing the strength dramatically. Better Brew explains that the ratio directly controls how much coffee solubles dissolve, which translates to perceived strength and bitterness.
For most home brewers, moving from 1:15 to 1:13 adds roughly 10 % more dissolved solids, giving that “extra kick” without needing more beans.
Special scenarios to consider
Altitude. If you live high up in the mountains, water boils at a lower temperature, so you might need a slightly stronger ratio (1:13) to compensate for the cooler brew.
Bean freshness. Freshly roasted beans release more CO₂, which can make the brew feel “fluffy.” If you notice a gassy mouthfeel, pull the ratio a notch tighter (1:14) to anchor the flavor.
Grind size. A coarser grind extracts slower, so a bolder ratio can help. Conversely, a finer grind may need a lighter ratio to avoid over‑extraction.
Action checklist
- Pick a baseline ratio (1:15 is safe).
- Decide what you want – bold, balanced, or light.
- Adjust by one water‑per‑gram step (e.g., 1:13, 1:14, 1:16, 1:17).
- Record the ratio, bean type, roast, and tasting notes.
- Taste, compare, and repeat until the profile feels just right.
It’s a bit like fine‑tuning a guitar: a tiny turn of the peg changes the whole chord.
Need a reminder of why the French press shines? 7‑Eleven notes that the method retains essential oils and fine particles, giving a richer body, so getting the ratio spot‑on makes that richness sing.
Once you’ve landed your perfect personal ratio, write it down, maybe stick the note on the fridge, and treat it like a secret recipe. The next time you reach for the press, you won’t have to guess – you’ll just pour.
And remember, the goal isn’t perfection; it’s enjoyment. If a cup feels “close enough,” that’s a win. Keep tweaking, keep tasting, and soon the perfect French press coffee ratio will feel like second nature.
Step 6: Cleaning and Maintenance Tips
Alright, you’ve finally nailed the french press coffee ratio and your brew tastes like a hug. But even the best cup will go sour if the press is dirty. So let’s talk about keeping that metal cylinder sparkling, the grounds out of the way, and the next brew ready in minutes.
Why cleaning matters
Old oils and coffee fines cling to the glass and the mesh, turning what should be a clean, bright cup into a bitter, gritty mess. A quick rinse isn’t enough – you want to remove the microscopic residue that changes the flavor profile over time.
James Hoffmann even points out that a proper clean‑up is the last step of his method, because “the coffee is probably still too hot to drink” but the press can be washed while you wait for it to cool according to Seven Coffee Roasters.
Step‑by‑step cleaning routine
- Discard the grounds and give the press a rough shake to dump the bulk.
- Rinse the carafe with hot water, then add a splash of dish soap.
- Use a soft‑sponged brush (the kind that fits the inside diameter) to scrub the walls. Avoid steel wool – it can scratch the glass or metal.
- Remove the plunger and separate the metal filter. If the mesh looks warped, straighten it gently with tweezers or replace it (Bodum sells replacement screens).
- Give the filter a dedicated soak in warm, soapy water. For stubborn oil, add a teaspoon of baking soda and let it sit for five minutes.
- Rinse everything thoroughly, then do a final rinse with plain hot water to eliminate soap residue.
- Dry with a clean towel or let air‑dry upside down.
Does this feel like a lot? Not really – the whole thing takes about three minutes once you get the rhythm.
Quick‑fix tricks for busy mornings
If you’re in a rush, a quick “press‑and‑pour” rinse works fine: fill the press with hot water, give it a vigorous swirl, press, and discard. The motion helps dislodge most of the leftover fines.
Another shortcut is to keep a small reusable silicone filter on hand. It catches the fine particles that sneak past the metal screen, meaning you’ll have less sludge to clean later.
Dealing with stubborn grounds at the bottom
Even with a perfect ratio, a thin layer of sediment can settle. Coffee Stack Exchange users recommend using a paper filter or a fine‑mesh tea strainer over your cup when you pour, which captures the last bits of grit as suggested by the community.
Or, after you’ve poured the bulk of the coffee, let the press sit for a minute. The remaining grounds will settle, and you can gently tip the carafe to pour the clear coffee without disturbing the sediment.
Maintenance checklist you can stick on the fridge
- After every brew: discard grounds, rinse, and wipe dry.
- Weekly: deep‑clean the filter and plunger with soap + baking soda.
- Monthly: inspect the mesh for warps; replace if needed.
- Every three months: give the glass carafe a vinegar soak (1 part vinegar to 3 parts water) to dissolve any lingering oils.
Keeping this checklist visible turns cleaning into a habit rather than a chore.
Pro tip: use the right water
Hard water leaves mineral deposits that look like a fine film inside the press. If you notice a chalky buildup, soak the carafe in equal parts white vinegar and water for 15 minutes, then rinse well. It’s cheap, effective, and keeps the taste pure.
And remember, a clean press not only protects the flavor of your current brew but also extends the life of the equipment. Treat it like a favorite kitchen tool, and it’ll reward you with consistent french press coffee ratio results for years.
FAQ
What is the ideal french press coffee ratio for a balanced cup?
Most coffee lovers land on a 1 : 15 ratio – one gram of coffee to fifteen grams (or milliliters) of water. That sweet spot gives you enough extraction to highlight chocolatey body without pulling too much bitterness. If you’re using a standard 8‑oz press, aim for roughly 16 g of beans and 240 ml of water. Adjust a gram or two up or down and you’ll notice the flavor shift right away.
How do I calculate the water volume when I change the coffee amount?
It’s simple multiplication: coffee weight × 15 = water in milliliters. So if you decide to brew 30 g of beans for a larger batch, you’ll need 450 ml of water. Keep a mental shortcut – the water amount is roughly the same number as the gram weight, just add a zero. Write the numbers on a sticky note; the habit saves you from endless mental math.
Can I use a different ratio for darker or lighter roasts?
Absolutely. Dark roasts often taste better at 1 : 13 because the extra coffee reduces the perceived bitterness. Light roasts, on the other hand, shine at 1 : 17, letting delicate floral notes come through. Try a single‑cup experiment: brew the same beans three times, each with a different ratio, and note which flavor profile feels most satisfying. That tiny tweak can turn a good cup into a great one.
What if I don’t have a kitchen scale – how can I approximate the ratio?
You can fall back on a tablespoon‑to‑ounce rule: one level tablespoon of coffee grounds per four ounces of water gets you close to 1 : 15. It isn’t perfect, but it’s reliable enough for everyday brewing. Scoop the beans, level it off, and use a measuring cup for the water. Over time you’ll develop a feel for the right “look” of a balanced brew.
Why does the coffee sometimes taste gritty even when I follow the ratio?
Grittiness usually comes from fine grounds slipping through the mesh, not from the ratio itself. Use a coarse grind that resembles sea salt, and give the plunger a slow, steady press. If you still get sediment, try a paper filter or a fine‑mesh tea strainer over your cup. A quick “press‑and‑pour” rinse of the press after each brew also keeps the mesh from building up residue.
How often should I clean the French press to keep the ratio consistent?
Clean after every brew: dump the grounds, rinse with hot water, and wipe dry. A weekly deep clean of the filter and plunger with soap plus a pinch of baking soda removes lingering oils that can mute flavor. Monthly, inspect the mesh for warps and replace if needed. Consistent cleaning ensures each cup reflects the exact ratio you measured, not the ghost of old coffee.
What’s the best way to remember my favorite ratio for future brews?
Keep a coffee journal or a sticky note on the fridge with the exact numbers – for example, “18 g coffee, 270 ml water (1 : 15).” Pair it with the bean type and roast level so you can replicate the same taste later. Some people even photograph the scale reading; a visual cue speeds up the routine and eliminates doubt the next morning.
Conclusion
We’ve walked through every step of nailing the french press coffee ratio, from weighing beans to fine‑tuning water, temperature, and cleanup. If you’ve ever felt a cup was “just off,” you now have a clear roadmap to diagnose and fix it.
Think about the last time you pressed a brew that hit all the right notes – that silky body, bright acidity, and no gritty finish. Chances are you unintentionally landed on a solid ratio and kept everything clean. The good news? You can repeat that magic every morning by recording your numbers and making tiny tweaks.
Remember, the ratio isn’t a rigid rule; it’s a flexible guide. Play with 1:13, 1:15, or 1:17, note how the flavor shifts, and let your palate be the judge. A single gram more or less can turn a mellow sip into an energizing jolt.
Cleaning may feel like a chore, but a quick rinse after each brew and a weekly deep‑clean keep oils from muting your coffee’s character. Treat your press like a favorite kitchen sidekick, and it’ll reward you with consistency.
So, what’s the next step? Grab your scale, jot down today’s ratio, and brew with confidence. The perfect french press coffee ratio is waiting – just press, sip, and enjoy.


Leave a comment